Eggplant in Garlic Sauce

Made this the other night. Eggplant is 99¢ a pound right now at my local Asian market so I’m buying them a lot this season. This is one of the veggie dishes found on Chinese menus that is okay for PKUers as long as they don’t over do it on its yummy and savory sauce (it does contain soy sauce). For my version, the aim is to preserve the flavor but making it more PKU friendly.

Tip: This is one of those dishes where it has a bold flavor.You can adjust the amount of garlic and chili pepper to your preferred taste. For me, I love it spicy hot and garlicky but Daniel is not as adventurous so my recipe is on the mild-medium side.

Ingredients:
4 Chinese or Japanese Eggplant, sliced diagonally
1 tsp salt
Large bowl of water (big enough to soak the cut up eggplant)

Slice the eggplant into ¾ inch pieces. In a large bowl, place the eggplant and salt them. Add in the water to let them soak for about 15 mins. (This allows the eggplant to not absorb all the oil with we pan fry them.). Mine kept floating to the top so I had to give them a stir so they all had a good soak. Once time is up pat the slices dry.

IMG_20160419_185212751

Eggplant having a Spa day.

Next, get you wok hot and ready. I had mine on low medium heat and a light coating of oil. Frying in batches, place enough of the eggplant slices in a single layer and let them cook on each side for no more than 2 mins. As each batch is done, put them on a plate.

IMG_20160419_193126672

Last batch before the next step.

Time to work on the garlic sauce!

Sauce:
1 tbsp oil
½ tsp sesame oil
2-5 cloves garlic minced
1 inch piece ginger, sliced thinly
1-2 hot chili pepper(s) sliced diagonally
1 cup water or veggie stock
½ tsp soy sauce
1 tbsp oyster sauce
1 tbsp Shaoxing rice wine or dry sherry
½ tsp sugar
1 tbsp cornstarch mixed with 1 tbsp water
dash of white pepper
Spring onion for garnish

In a small pan on low-medium heat, pour in your cooking oil and sesame oil. Once that is heated add in minced garlic, ginger and chili peppers (move them around with your utensil so the garlic doesn’t burn). Next add in the veggie stock/water, soy sauce, oyster sauce, Shaoxing wine and sugar. Once this heats up add in the cornstarch water mixture to thicken up your sauce. Add a dash of white pepper.

IMG_20160419_194642580

Mmmm garlicky!

Once your sauce is ready toss in your cooked eggplant and mix them into the sauce. Allow the eggplant to cook thoroughly and soften a bit. Sprinkle on the chopped spring onions. Serve with Low Pro imitation rice.

Enjoy!

IMG_20160303_200350650.jpg

Yummy!

Taro and Mushroom Stuffed Eggplant

Another one of my favorite dim sum items is stuffed eggplant. For a PKU friendly version,  I replaced the minced shrimp with minced veggies. It doesn’t taste like shrimp, but is a nice substitute for it.

image-6474

So fancy! I broke out my food processor!

Tip: You are going to need a food processor and steamer baskets for this.

Both taro and mushrooms get watery when minced. Your filling mixture needs to have the texture of ground meat. If it’s on the watery side, add mash potato flakes to thicken it up.

Ingredients:
4 large Chinese eggplants, cut diagonally into 2 inch pieces with a slit in the center
Oil for frying
Water for steaming

Filling:
1 small Taro (about 4 inches tall), cubed
4 oz Mushrooms, sliced
½ cup mash potato flakes (optional if mixture is watery)
½ tsp salt
½ tsp white pepper
1 tsp sesame oil
1 tsp Shaoxing rice wine (dry sherry can be subbed)
2 spring onions finely chopped

In a food processor, toss in your cut up taro and mushrooms. Pulse it until the mixture is minced. Don’t over do it or it will liquidity. Remove mixture and put it into a bowl. Add in your seasonings. The filling needs to be thick, if it’s watery, add in the potato flakes to stiffen it up.

image-6475

I promise it tastes better than it looks!

Time to assemble! Stuff the eggplant pieces. Don’t let the  stuffing over flow or it will seep out when cooking. In a pan add enough oil to coat the bottom add more oil as you go to keep the  eggplant from sticking to the pan. Cook both sides. Cover with a lid if needed to help cook thoroughly.

image-6476

*sizzling noises*

Remove from pan and let it rest while we get our steamer set up. In a pot, add enough water for your steamer basket and get your pot steaming. When it is ready, gently and carefully place in the pan fried stuffed eggplant. Cover with the steamer and pot lids. Let this cook for 7-10 mins. The eggplant needs to be soft.

image-6487

Ready to steam. This is one eggplant cut up and stuffed.


While this is steaming, lets work on our sauce.

Sauce:
1 tsp oil
½ tsp sesame oil
1-2 cloves garlic minced
½ cup water or veggie stock
½ tsp soy sauce
1 tbsp oyster sauce
½ tsp sugar
1 tbsp cornstarch mixed with 1 tbsp water
dash of white pepper
Spring onion for garnish

In a small pan on low-medium heat, pour in your cooking oil and sesame oil. Once that is heated add in minced garlic (careful, these burn easily). Next add in the veggie stock/water, soy sauce, oyster sauce and sugar. Once this heats up add in the cornstarch water mixture to thicken up your sauce.

Remove the eggplant from the steamer and plate it. Drizzle on the sauce to coat it and garnish with spring onions.

Enjoy!

image-6483

Perfect as dim sum or Friday night dinner.


Low Protein Veggie Jiaozi (Chinese Dumplings)

Adding to the PKU Dim Sum Menu and another versatile snack where the filling options are endless. I basically threw in the veggies that we had in the fridge for this one. Also there are two different wrapper skins. One that’s for steamed only and the other for steamed and pan fried.

The low pro baking mix ones can be made in large batches and frozen for later use! Makes great quick meals or lazy dinner options (even I have days where I don’t want to make anything). Place raw dumplings on a baking sheet lined with wax paper (keep from sticking) and place in the freezer. Once frozen they can be stored in a tupperware container or a freezer proof zip-lock bag. Shove it back into the freezer. When ready, cook them the same way as the fresh ones!

image-6337

Pan fried version with the low protein baking mix dough and dippy sauce.

Tips: Anything can be used as filling for these. The jackfruit and mushroom filling for the Por-KU Buns are tasty too! For a more balanced cabbage to mushroom ratio, use 16 oz of mushrooms to 1 head of cabbage. The filling amount is enough to make both wrapper options and then some!

Filling:
1 cabbage finely shredded
8 oz white mushrooms, minced
2 carrots, minced
2 tsp soy sauce
1 tbsp oyster sauce
1 tbsp rice vinegar
1 tsp white pepper
1 tbsp onion powder
1 tbsp ginger powder
1 tbsp garlic powder
1 tsp five spice powder
2 spring onions, chopped
oil for cooking

In a large pot, heat up your oil. Once warm, toss in the cabbage, mushrooms and carrots. Allow the cabbage to wilt  and soft a bit. Next add in both soy and oyster sauces, white pepper, onion, ginger, garlic and five spice powders. Let this cook thoroughly, stirring occasionally. Your veggies should be tender enough but not mushy (if it’s too hard, it’ll poke holes in the wrapper). Sprinkle chopped spring onions if desired)

While the filling is cooling, lets work on the dumpling wrappers.

As I said before, I made two different kinds that are PKU friendly. The first is a wheat starch wrapper that’s actually used for Har Gao (shrimp dumplings)! While shrimp is not low pro, the wrapper used for Har Gao is! YAY!!!!! The second is using a low pro baking mix to mimic wheat dough wrappers. To make the dumpling wrappers into flat circles, I use my tortilla press lined with wax paper. Super easy with low pro mixes, not to mention faster than a rolling pin.

Dough 1:
1 ½ cup wheat starch
1 cup boiling water
1 tbsp lard or veggie shortening

Mix ingredients together and knead into a smooth dough. Dough will be hot so be careful if you are mixing and kneading by hand. Separate dough into small balls. I managed to get about 20 wrappers (2½ inches diameter) out of this amount. Cover with cling wrap to prevent the dough from drying out as you assemble the dumplings.

image-6332

Wheat starch dough is kinda sticky so make sure they do not stick together in the steamer.

Fold in 5-6 pleats on one side of the wrapper, place in your filling  and press together with  the unpleated side. Place on cabbage/parchment paper lined bamboo steamers. Heat up your pot with ½ a inch of water. Once the water is steaming,  add in your baskets and close the lid. Steam each set for 5 mins ONLY. Too long and the wrappers become brittle. Remove promptly, plate and serve with dippy sauces.


image-6339

Great as an appetizer and also as a meal!

Dough 2:
3 cups Taste Connection Multi-mix
1½ cold water

Mix together the ingredients and knead into a smooth ball. Separate into small dough balls about an inch around. I got about 18-20 wrappers, 3 inches in diameter, out of it. These dumplings can be assembled the same way as the previous ones or press into half moon shapes. In a frying pan, heat up oil and place your dumplings in and fry each since evenly. (optional: if you want to pan fry-steam them add some water to the frying pan and cover the pan with lid). Plate it and serve with dippy sauces.

image-6329

Pan fried goodness!

Dippy Sauce:
1 tsp soy sauce
1 tbsp oyster sauce
3 tsp ketchup
1/8 tsp five spice powder
2 tbsp water
chili or sriracha sauce (optional for a spicier kick)

Mix together ingredients together. Sauce should be on the thin side, add a bit more water if needed. Sauce amount is enough for the entire plate of dumplings.


ENJOY!


“Por-KU” Buns (Hum Bao)

First in the Dim Sum for PKUers series is Por-KU Buns! Hum bao is one of my favorite items to get whenever I go do Dim Sum. Seeing the steam waft over the soft cloud puffs filled with deliciousness is food happiness for me! So of course I NEEDED to make a PKU version of it. This is a two part recipe. The first is marinading your “meat” (veggies), preferably overnight and the second consists of the assembling and cooking.

Note: The phe amounts will vary depending on what you use for the filling. I only had one can of green jackfruit so I added shiitake mushrooms. These are a bit higher than white mushrooms, which can be subbed to decrease the phe amount. Cabbage can also be added. Once I get all the phe amounts calculated, I’ll update these posts with that info.

Makes 8 large buns

Filling Ingredients:
For the marinading part:
1 can Green Jackfruit (10 oz/280g) or fresh, skinned and seeded
1½ tsp light brewed soy sauce
1 ½ tsp dark brewed soy sauce
1 ½ tbsp caster (powdered) sugar
1 ½ tsp Five Spice powder
¾ tsp baking soda
1 tsp crushed garlic or garlic powder
1 ½ tbsp vegetable oil
3 or 4 drops red food coloring (optional)

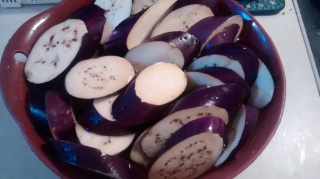
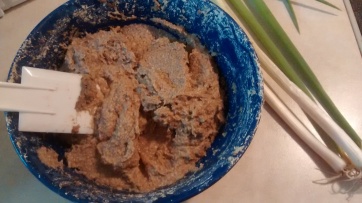
In an oven safe pan shallow enough for marinating, toss in and mix everything but the jackfruit. If using canned (don’t forget to remove any seeds that may still be in there!), place the wedge pieces in the pan in a single layer and coat both sides. If using fresh, either cut it into slices (like the wedges) or rolled it whole to coat (kinda like a jackfruit version of a pork loin, yes the marinade can be used to make roast “pork loin” if using the whole jackfruit). Cover with cling wrap and refrigerate for 1 hour to overnight (preferred), turning the jackfruit occasionally.

image-4349

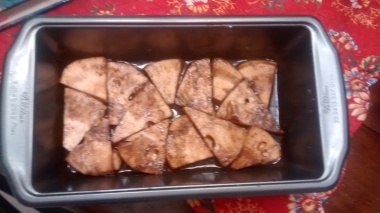
Marinading jackfruit wedges.

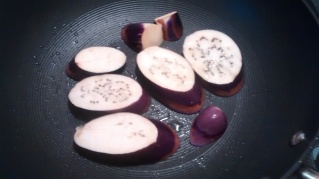
Place oven rack on the second highest level in oven. Preheat oven to 300° F. Put the pan in and roast for 12 mins, flip pieces over and roast for 5 mins more. Take it out of the oven and let it cool. There should be marinade left in the pan (save this for the filling!).


Okay next part of the filling ingredients:
1 pan Roasted jackfruit
4-5  dry shiitake mushrooms (2 inches across) soaked in warm water to soften
left over marinade and a bit of water
2 spring onions (for garnish in bun)

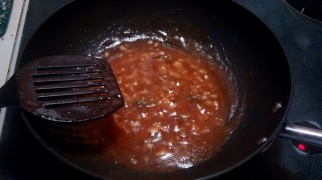
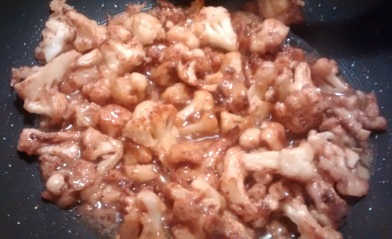
Once the jackfruit has cooled, take it out of the marinade and chop it up to  ¼ inch cube pieces. When the mushrooms are soft and squishy, drain and chop them up to the same size as well. In a pot, heat up the jackfruit, mushrooms, marinade. If the marinade thickened up from the roasting, add a small amount of water to wet it. Stir to mix ingredients together. Remove from heat once everything is cooked.

Bun Ingredients:
4 cups Taste Connections Multi Mix
2 tbsp Baking powder
2/3 cup water (may need a tbsp or more if dough is too dry)

2″ x 2″ parchment paper squares or cabbage leaves for steaming

Bamboo or metal steamer baskets and a pot large enough to house them
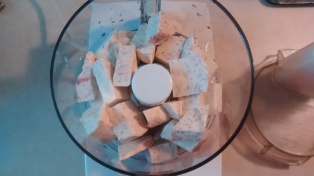
In a bowl, mix together the above ingredients. The dough consistency should be similar to the dough for the low pro samosas. Add more water or mix as needed to get a pliable dough.

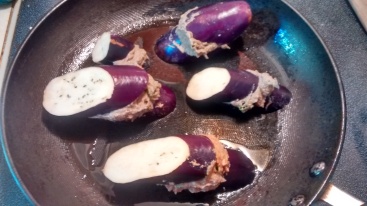
Separate the dough evenly into 8 parts. On a flat dusted surface, roll out into 4″ circles (about ¼” to ½” thick). This can also be done without the rolling pin by flattening out the dough between your hands. Place about one tbsp of filling on the center of the circle. Add some cut spring onions on top and  use your fingers to pinch close the tops. If using parchment paper squares, slap one square on each bottom. If not, just line your steamer basket with cabbage leaves. The steamed leaves aren’t required, but they add a nice flavor to the buns. Place your buns into the steamer baskets, making sure there’s enough room between each one (these puff up a bit when steamed).

image-4352

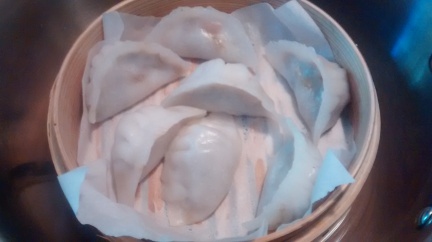
Raw buns waiting for the steamer.

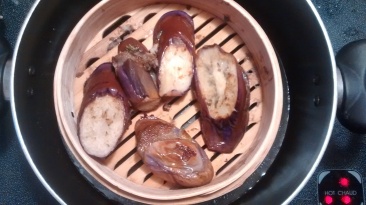
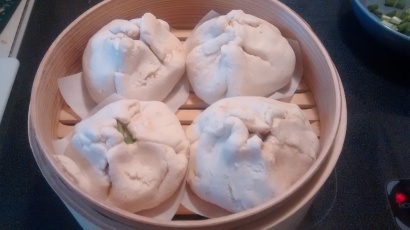
Time to get the steamer ready. I used a stock pot tall and wide enough to house my steamers. Add a layer of water to the pot (no higher than the bottom steam basket). Bring water to boil. Set stove temp to low (on my stove it’s #2) and carefully stack your steamer baskets.If you have tongs with a good grip, use them to gently lower the baskets in. Place the steamer lid and the pot lid on. The low pro mix takes longer than regular flour to fully steam. It will need to steam for about 10-15 mins, until  bread is spongy on the inside and has a slick slightly harden surface . If the bread is still doughy or gummy, steam it longer.

image-4353

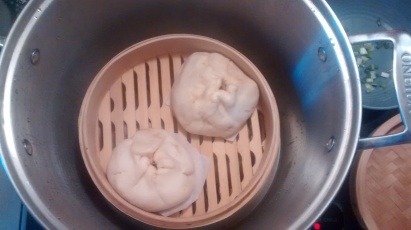
These guys needed to be steamed some more.

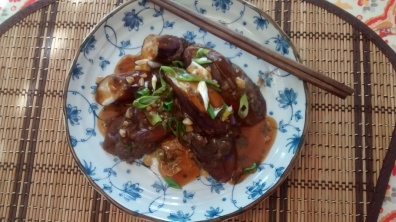
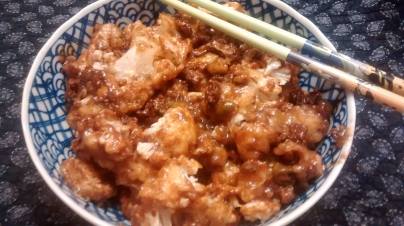
After they are ready, turn off your heat and let it sit for a bit. Carefully take your baskets out from the steam pot. Your bao is ready to serve! If dippy sauces are desired, they can be dipped in red pepper oil. If your phe tolerance is higher, mix in some soy sauce to the pepper oil. Personally, I think they are great on their own!

For reheating leftovers, they can be re-steamed for a short while in the baskets in the pot or  wrapped in a wet paper towel in the microwave for 1 to2  mins. FYI that paper towel will be HOT, remove carefully!

Now enjoy your puffy cloud of deliciousness!

image-4358

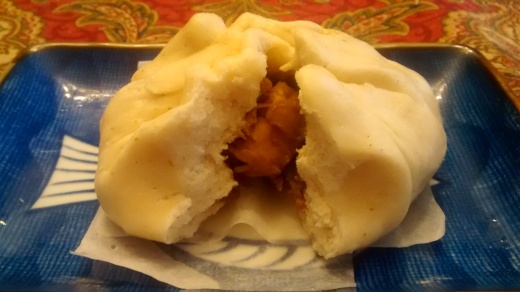
Hum Bao says, “Resistance is futile!”


General Tso’s Cauliflower

One of the down sides of dining out with PKU is that some menus are limited. At most places my husband is stuck with salad and fries. If he’s lucky, the sides menu will have a bunch of stuff he can do. On the vegetarian menu for any given Chinese restaurant and take out, Daniel is limited to either Mixed Vegetables, Bok Choy, Broccoli (Gai Lan) with Oyster Sauce or Eggplant in Garlic Sauce. All of these are great, but I can see why he gets tired of the same old thing when you want to have something different. Going out for Dim Sum is next to impossible (I’ll post my PKU friendly Dim Sum recipes later). I’ve seen veggie versions of General Tso but they tend to either be made with egg whites in the batter (makes the batter extra crispy) and with tofu as a replacement for chicken. Both ingredients are still too high in phes for PKUers.

IMG_20160225_210402612

mmmm Crispy and oh so DELICIOUS!

Tip: Given the structure of the low-pro batter and to preserve the crispy texture, I highly advise making the sauce first before you fry the battered cauliflower florets. Fry only the amount you need to serve. You can always fry more when you are ready for seconds or even for lunch the next day. The left overs are still great, but the florets loose their crispiness once the sauce is soaked in and sitting in your fridge overnight.

Ingredients:
Sauce:
2 tsp oil
1 tbsp dark brew soy sauce
1 tbsp oyster sauce
2 red chilies add more of for an extra spicy dish
1 tsp sugar
1/2 tsp sesame oil
1/2 tsp rice vinegar
4 tsp Shaoxing wine or dry sherry
2 garlic cloves, minced
1 inch piece ginger, smashed and minced
1 tsp szechaun pepper
1 tbsp cornstarch mixed in 2 tbsp water (to thicken the sauce)
Green onions chopped for garnish (optional)

Use a wok if you have one or a high rimmed pan or a pot. Set your heat to low-med and add in your oil. Once your wok/pan/pot is warmed up, add in soy sauce, oyster sauce, chilies, sesame oil, rice vinegar and Shaoxing wine. As this gets going, toss in your garlic and ginger and szechaun pepper. Stir to mix everything in. Pour in the cornstarch mixture and allow the sauce to thicken up. Turn off heat and set aside.

Now it’s time to work on the batter!

Batter and Bits:
1 head of cauliflower chopped into florets, the white stock can be chopped up and added too
3/4  cup corn starch (rough estimate, add more depending on size of cauliflower)
1 tbsp rice flour
3 tsp rice vinegar
1 tbsp sesame oil
Ener-G Egg replacer and water for one egg amount.
pinch of salt and white pepper
4 tsp water or enough water to make the batter lightly coat florets but not too thick.
oil for deep frying

In a bowl, mix together your dry and wet ingredients. The batter needs a medium consistency. Too thin and it will slop off when you toss it in the sauce. Too thick and it will be globby. I like to dip my cauliflower bits one at a time as I fry them so they stay evenly coated. Using your frying method of choice (in a pan or deep fryer), fry them in hot oil until golden brown. Drain on a paper toweled plate.

Heat the wok with the sauce back up to low med and toss these babies in! Stir and get them coated all over. Add in the green onions for garnish (optional) and serve with low protein rice. Enjoy!

12829310_10153961672020768_1060305203616497887_o

Fresh out of the wok and soon to be in my tummy! (We ran out of green onions)